Due to the timey wimey wibbly wobbly nature of Tenet, the opening is arguably one of the most confuddling things ever put to film. Who is The Protagonist working for, why do the SWAT team members turn on him? What happens to the algorithm and what the hell is everyone saying?
Well, we’re gonna be breaking it all down and answering some of the big questions to clear up any confusion.
Beginning Explained
Ok so whilst I normally tend to do Ending Explaineds, because of Tenet’s plot structure and time manipulation, I think it’s actually fitting that this is the first film that I break down the opening of.
Throughout the movie, we’re told that ignorance is a weapon and at almost every major plot point in the movie, The Protagonist has absolutely no idea what’s going on.
This is very much the case with the audience too and Nolan purposely drops us in at the deep end so that like the lead, we have little to no idea what’s going on. Now up top, this is happening at the exact same moment that the mission at Stalsk-12 is and across the timeline, a version of both Neil and The Protagonist are storming Sator’s forces to get an already completed algorithm.
However here the characters have not lived through that moment and are thus having to help it be collected so that Sator can assemble it for them to steal and then separate it at Stalsk-12.
If we look at Neil we meet at this point he saves the Protagonists life, meets him in India and the two then go through the airport scene, highway chase and invert to go back to this point in time so that they can stop the Algorithm from being dumped. The movie itself is a Palindrome and the moment that it opens is also the place where its final action scene takes place.
Protagonist Doesn’t Know Yet
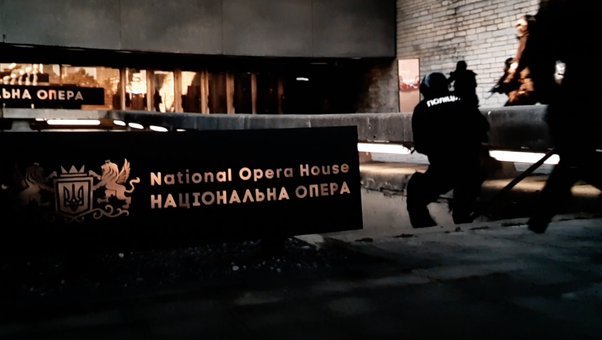
Now Neil is aware of his mission from the off whereas The Protagonist that we follow is not. He is currently working for the CIA and was tipped off that there would be an attack at the Opera house which would allow him and his team to slip in and make contact with a Ukrainian high official known as The Well Dressed Man.
Before the real SWAT Team even arrive, both The Protagonist’s forces and one-half of Sator’s wait in a van for them to show up so that the former team can slip in and meet this contact to get the package. The CIA is actually being duplicitous here and they plan to work with Sators men but double cross them to get the well-dressed man so that they can gain intel from him.
They want to swap him out with their decoy so that they have a mole and can also learn exactly what’s going on.
They are sitting waiting for the events to kick off to infiltrate the location under the guise of their ranks. This is why we see them wait until a specific SWAT team shows up so that they can choose the exact badges to use to infiltrate undetected.
Tip OffTip-Off
But how did he know this would happen, especially as the event hadn’t even taken place yet from The Protagonist’s point of view?
Well, this is because the CIA was tipped off by The Future Protagonist who knew that his past self would have to go through this to become him. He of course was key in supplying the fake cyanide pills so that not only would his past self take one, but also so that SATOR would get the other to use it at the end.
Now the reason I said that there were half of SATOR’s men with The Protagonist is that the other half is carrying out the attack. This is a temporal pincer in many ways as one team will set off the events to get the SWAT team to come in which will allow the other part of the team to use The Protagonist to get the algorithm piece and they will then take it.
One team is also tasked with planting explosives to cover their tracks so no one knows about what they really got away with.
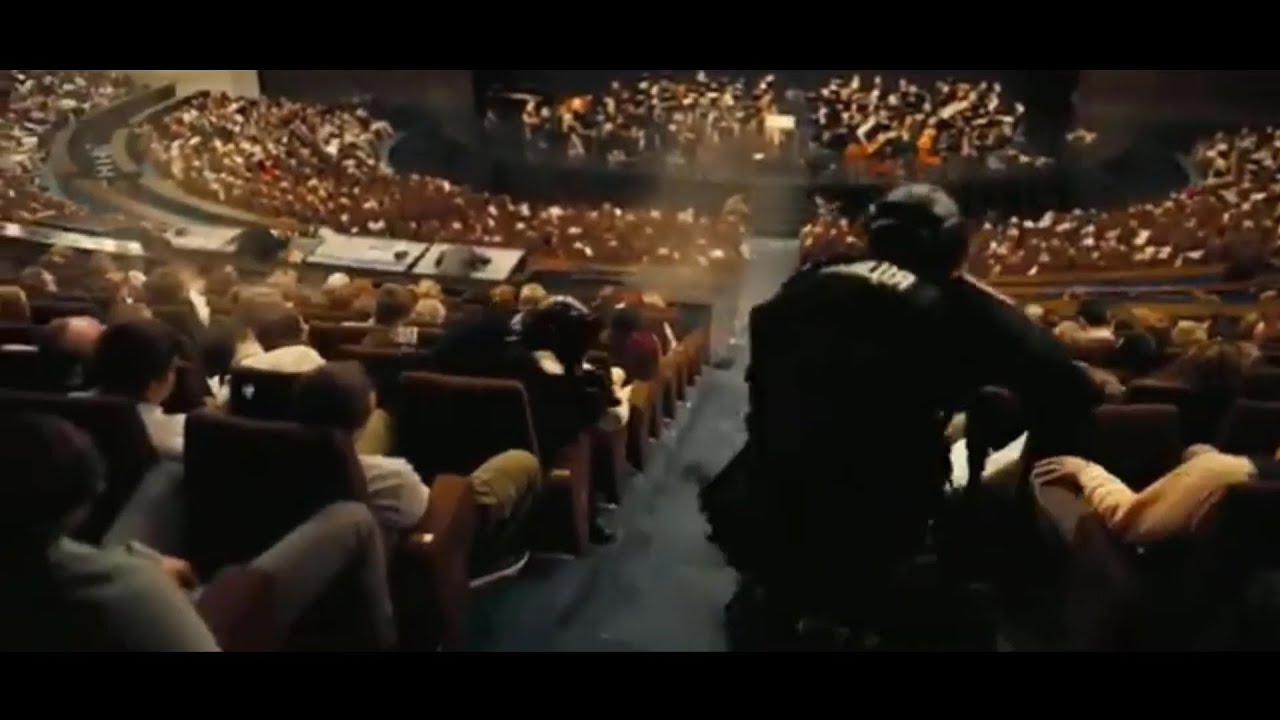
Now The Protagonist waits until the SWAT team launches and they start to pump sleeping gas into the sealed room. This scene in general is actually based on The Moscow Theatre Hostage crisis in which gas similar to this was used. However unlike TENET, in real life the gas was poisonous and it’s estimated that deaths were in the 200s due to complications that were caused by it.
As this is happening and the Ukrainian Swat Team are storming the hypocentre of it, The Protagonist and his CIA team sneak off and go to his private booth. We see The Protagonist dismantle one of the security guards’ guns by grabbing the top of it and yanking it off, this is something that he would later do when fighting himself at the airport.
Another bit of foreshadowing comes with the password We Live In A Twilight World and this is later used by Sator, cementing that he had something to do with this plot. Now it is possible that Sator was the one who tipped off the CIA and that is why they are working with his men but either way that information comes from The Protagonist who may have let Sator know to allow his past self to go on the path he does.
I don’t wanna go down the rabbit hole of why Sator was actually working for The Protagonist again but I’ve made a video on that which you should definitely check out if you’re interested.
Now the Protagonist informs The Well Dressed Man that this seige is actually blind to vanish him and he gives him the choice to either go with him or die. The Well Dressed Man could easily have remained a spy and stayed with the Ukrainians but The Protagonist telling him this makes him realise that he has to go with the CIA to stay alive.
Thus they leave the booth and The Protagonist tells him to remain in a seat so that he can go and get the algorithm. Now it’s at this point that he discovers the explosives laid out by Sator’s men and is also caught by a real swat team member. He flips the fake badge off him and asks who he is, his CIA team member shows up and shoots him and then goes to take the Well Dressed man to the rally point aka a room in the Opera where they can do a little switcheroo that we’ll talk about in a bit.
Finding the Algorithm Piece
Now The Protagonist arrives at the baggage and coat racks and goes to number 248.
Later in the film, an Algorithm piece is named 241 and as we know it’s split into 9 parts so 241 and 248 do denote separate pieces of it…I think anyway…that might be a reach.
The Protagonist gets the bag and is confused over the piece as he doesn’t know what it is. He goes to the rally point which is when his CIA contact from the van switches clothes with The Well Dressed Man. You will remember him from before as someone that The Protagonist spoke to.
The well-dressed man mentions that he has a way out through a service tunnel and with one-half of the SWAT team he takes the Algorithm off and escapes through the sewers.
How Did Sator’s Men Do It?
Now I’m not sure exactly how Sator’s men manage to get a hold of this but there are two possibilities. Now the first one is that when we see them talking about rewinding the clock later that they are actually carrying out a temporal pincer to attack this team in the sewers. Thus the well-dressed man was killed and the Algorithm was taken.
However, there is another possibility that I go with and I think that this team did make it out and the piece that we later see being stolen is the same. They do look very similar so I believe that is what happened.
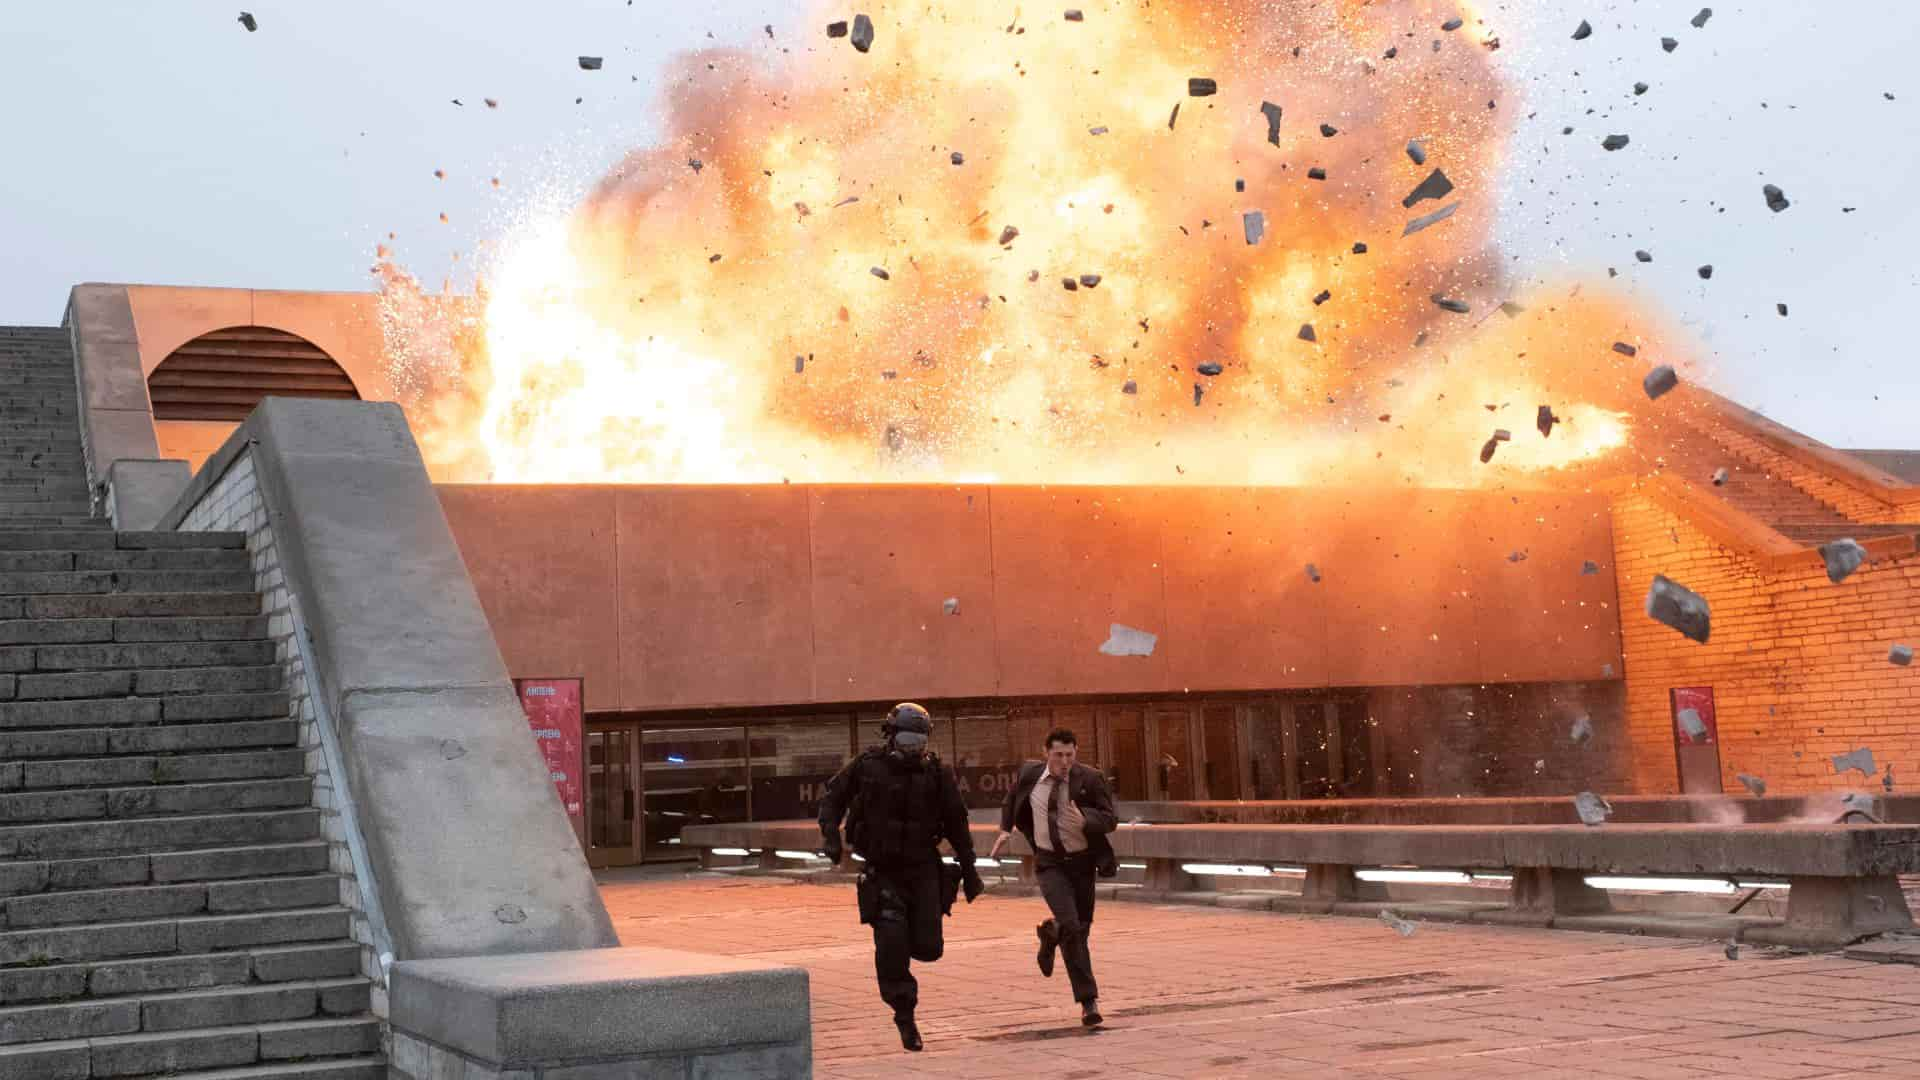
The Protagonist and his team member are informed that there’s no way to stop the explosives from detonating and thus they run back through the Opera house to collect them.
Now a SWAT team member catches The Protagonist with one and this moment is slightly confusing. He may catch The Protagonist planting it and believes that he is the one behind it.
However, it could also be one of Sator’s men in disguise and this is why he says you don’t have to kill them. Either way, it all comes to the same head but yeah, a couple of possibilities here including the Russians potentially even trying to cover up they’ve just gassed lots of people. I might even be wrong about Sator’s men planting the explosives and this would be more in line with the Moscow Theatre Crisis in which there was a coverup by the Russians that they basically killed the hostages they were trying to save.
Inverted Bullets
Whoever he is he has a gun to the characters head but an inverted bullet flies backwards through him and goes into Neil’s gun. Neil is actually moving forward at this point but the gun and bullet have been inverted so this can happen. We see this in full motion later in the movie when The Protagonist is firing a gun at the wall.
Off-topic but this Wall actually comes from Stalsk which is why the bullets and so on go backwards from it. Big shoutouts to HD Gaming for sending me that through.
Now Neil runs off and with his buddy, The Protagonist throws the explosives and returns to Sator’s team’s van.
Double Crossed
However, they know that they have been double-crossed and thus they double-cross the CIA and take them to the train yard to find out where the real Well Dressed Man and algorithm are.
We can see trains moving in two different directions and this actually subtly foreshadows the direction that time will be going in the movie.
They start to torture The Protagonist for information and even pull his teeth out. His cyanide pill is removed but he manages to get one from his ally who kept theirs.
Meeting Tenet
Believing that he is dead, Sator’s men leave him at the train yard and he’s picked up by TENET.
They give him time to rest and though never explicitly stated, I think that TENET distributed numerous cyanide pills throughout the CIA which actually put people into a coma.
Over the years several were supposed to take them as part of TENET testing who was worthy of joining their ranks but only The Protagonist himself did.
He’s given the keyword and then dropped off at a Windmill out the way. We later see a future version of The Protagonist on this same boat moving past the location so it’s clear that he was purposely placed here out of the way to stop himself from interacting with his future version.
Anyway, that’s pretty much the opening of the movie. I know it’s difficult to understand especially with the dialogue
But hopefully, you don’t need an explanation video to explain this video and if there’s anything you’d like to add then make sure you leave them in the comments section below.


Leave a Comment
You must be logged in to post a comment.